
Study the complete Class 9 Kaushal Vikas Chapter 5 question answers on safety signs, material selection, measuring tools, product development, technical drawing, workshop safety, and real-life uses.
Question Answers
Check Your Understanding – Page 81
1Do you see any of the safety signs and symbols in your surroundings? Carry out a safety check of your school and nearby areas. Discuss where these symbols should be placed and why. If you feel the need, make up your own symbol and assign it a colour. Justify its importance.
Yes, we can see many safety signs and symbols in our school and nearby areas. Some common examples are fire extinguisher signs, first-aid signs, emergency exit signs, no smoking signs, electric shock warning signs, slippery floor signs and helmet/safety gear signs.
During a safety audit of the school, the following places should be checked:
| Place | Safety Symbol Needed | Reason |
|---|---|---|
| Science laboratory | Electric shock warning, fire extinguisher, first aid | To warn students about electric equipment, chemicals and fire risk |
| Staircase | Slippery floor warning, emergency exit arrow | To prevent slipping and guide students during emergencies |
| Playground | First-aid sign | To provide quick help in case of injury |
| Workshop / activity room | Wear gloves, wear safety goggles, caution for sharp tools | To prevent injury while using tools and materials |
| Canteen / kitchen area | Hot surface warning, fire extinguisher sign | To warn about hot utensils, gas stove and fire danger |
| Main gate / parking area | Slow down, no parking, pedestrian crossing | To avoid accidents near vehicles |
| Corridors | Emergency exit signs | To guide students during fire, earthquake or other emergencies |
According to the chapter, safety signage uses standard colours: red for fire/prohibition, yellow for warning, blue for mandatory actions, and green for safe conditions or guidance.
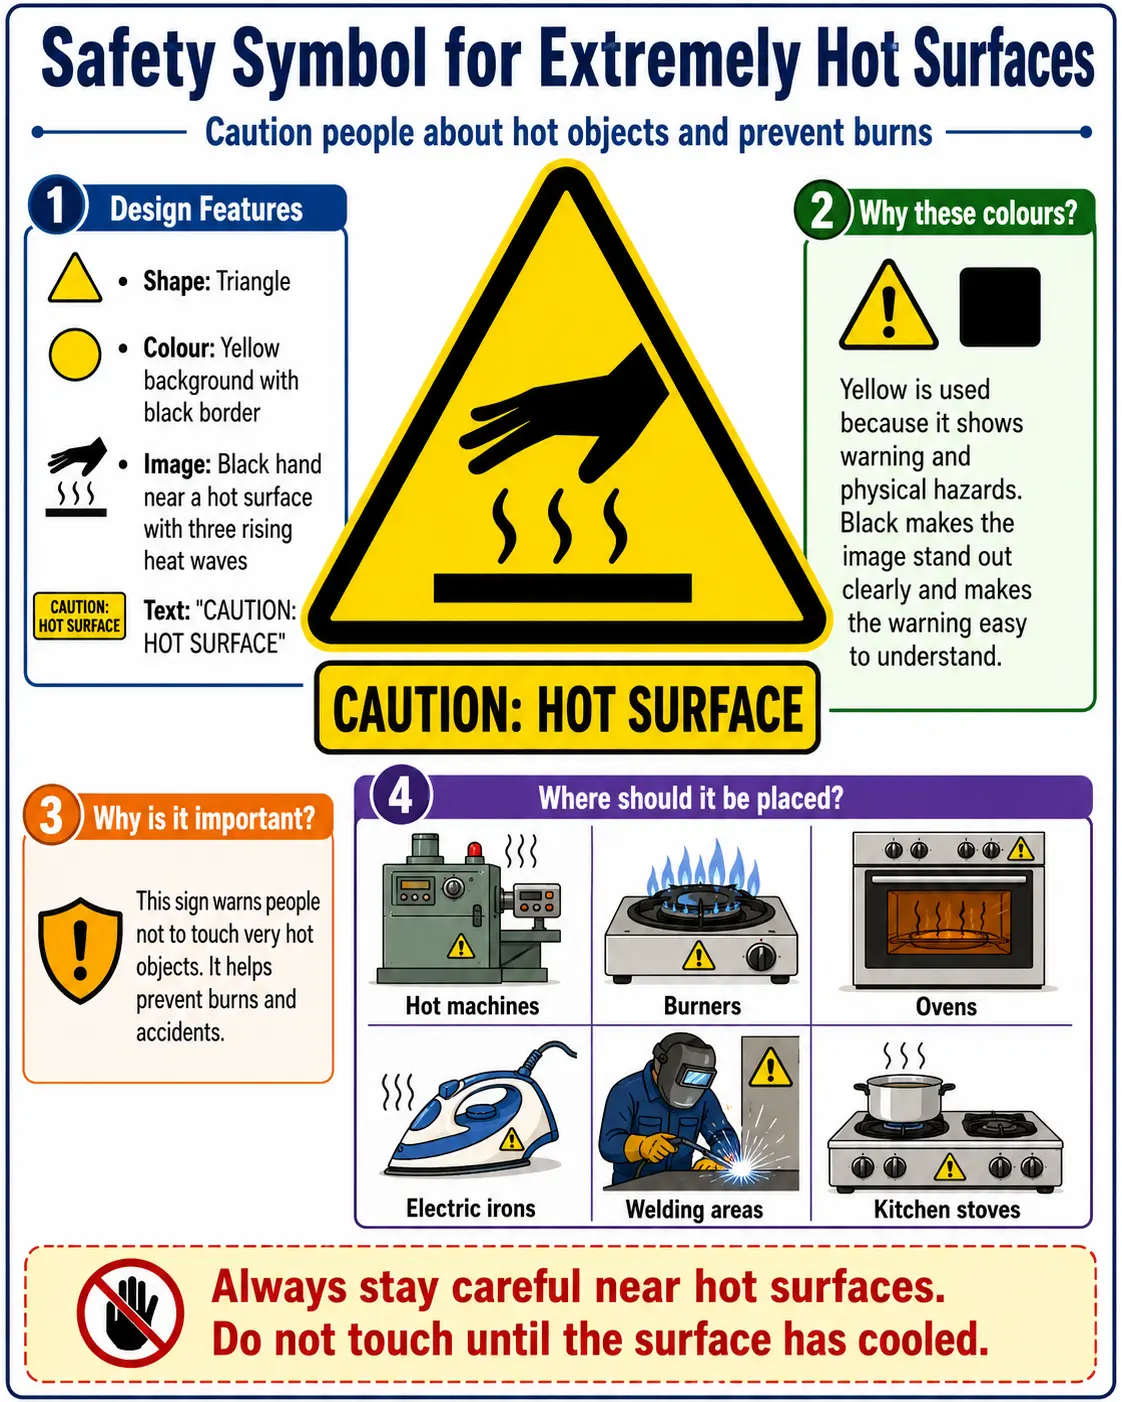
My own safety symbol: I would create a yellow triangular sign with a black image of a hand near a hot surface with heat waves.
Meaning: Caution – Hot Surface
Where it should be placed: It should be placed near the school kitchen, science laboratory burners, electric iron area, welding area or any machine that becomes hot.
Justification: This symbol is important because students may accidentally touch hot objects and get injured. A clear warning sign will alert them to stay careful.
Question Answers
Assess Your Learning
1You are given clay and wood to make a pen stand. Which one of the two (clay and wood) will you choose? Compare the characteristics and explain your decision.
I would choose wood to make a pen stand.
| Basis of Comparison | Clay | Wood |
|---|---|---|
| Strength | Soft clay is weak; fired clay becomes hard but can break easily | Strong and durable |
| Weight | Can be heavy after shaping | Light to medium weight |
| Shaping | Can be moulded easily when wet | Can be cut, drilled and joined easily |
| Durability | Breakable if dropped | More durable and long-lasting |
| Finishing | Needs drying and firing | Can be sanded, polished and painted |
| Water resistance | Clay may get damaged if not fired or coated | Wood can last longer if polished or painted |
| Suitability for pen stand | Good for decorative pen stands | Better for regular classroom use |
Wood is better because it is strong, stable and easier to cut, join, sand and polish. It can hold pens properly and will not break easily during daily use. Clay is also useful for craft work, but it needs proper drying and firing to become durable. Therefore, for a strong and long-lasting pen stand, wood is a better choice.
2Create a safety symbol to caution people about extremely hot surfaces. Think about the colour and image while you design it.
A safety symbol for extremely hot surfaces can be designed as follows:
3Your teacher gives you three objects to measure – a pipe’s inner diameter, a cloth length, and the length of the classroom. Which instrument will you use for each and why?
| Object to be Measured | Instrument Used | Reason |
|---|---|---|
| Pipe’s inner diameter | Vernier callipers | It can measure small internal diameters accurately |
| Cloth length | Metre tape | It is flexible and suitable for measuring cloth and curved surfaces |
| Length of classroom | Metre tape or distance metre | These are suitable for measuring longer distances |
A vernier callipers is used for the pipe’s inner diameter because it has high accuracy and can measure small dimensions. A metre tape is used for cloth because it is flexible and can measure fabric easily. For the classroom length, a metre tape or distance metre is suitable because the classroom is a large space. The chapter explains that measuring tools should be selected according to the object, required accuracy and range of measurement.
4Your group made a wooden tray, but it looks uneven and does not stand flat. On the basis of the common steps of developing a product discussed in the chapter, identify what could be the cause of the error.
The wooden tray may look uneven and may not stand flat because of mistakes in the common steps of product development.
Possible causes are:
- Error in design and estimation — The group may not have prepared a proper drawing with correct dimensions.
- Wrong measurement and marking — The wood pieces may not have been measured or marked accurately before cutting.
- Uneven cutting and shaping — Some parts may have been cut longer, shorter or at an incorrect angle.
- Improper joining and assembling — The sides and base may not have been joined at right angles. Nails, adhesive or screws may not have been fixed properly.
- Poor finishing — Sanding may not have been done properly, leaving uneven edges or surfaces.
- Lack of quality checking — The group may not have checked whether the tray was level before final finishing.
The correct process should be: design and estimate → measure and mark → cut and shape → join and assemble → finish → check quality. For wood, the chapter mentions drawing the product, marking cuts and drilling points, cutting with a saw, joining with adhesive or nails, and finishing by sanding, polishing and painting.
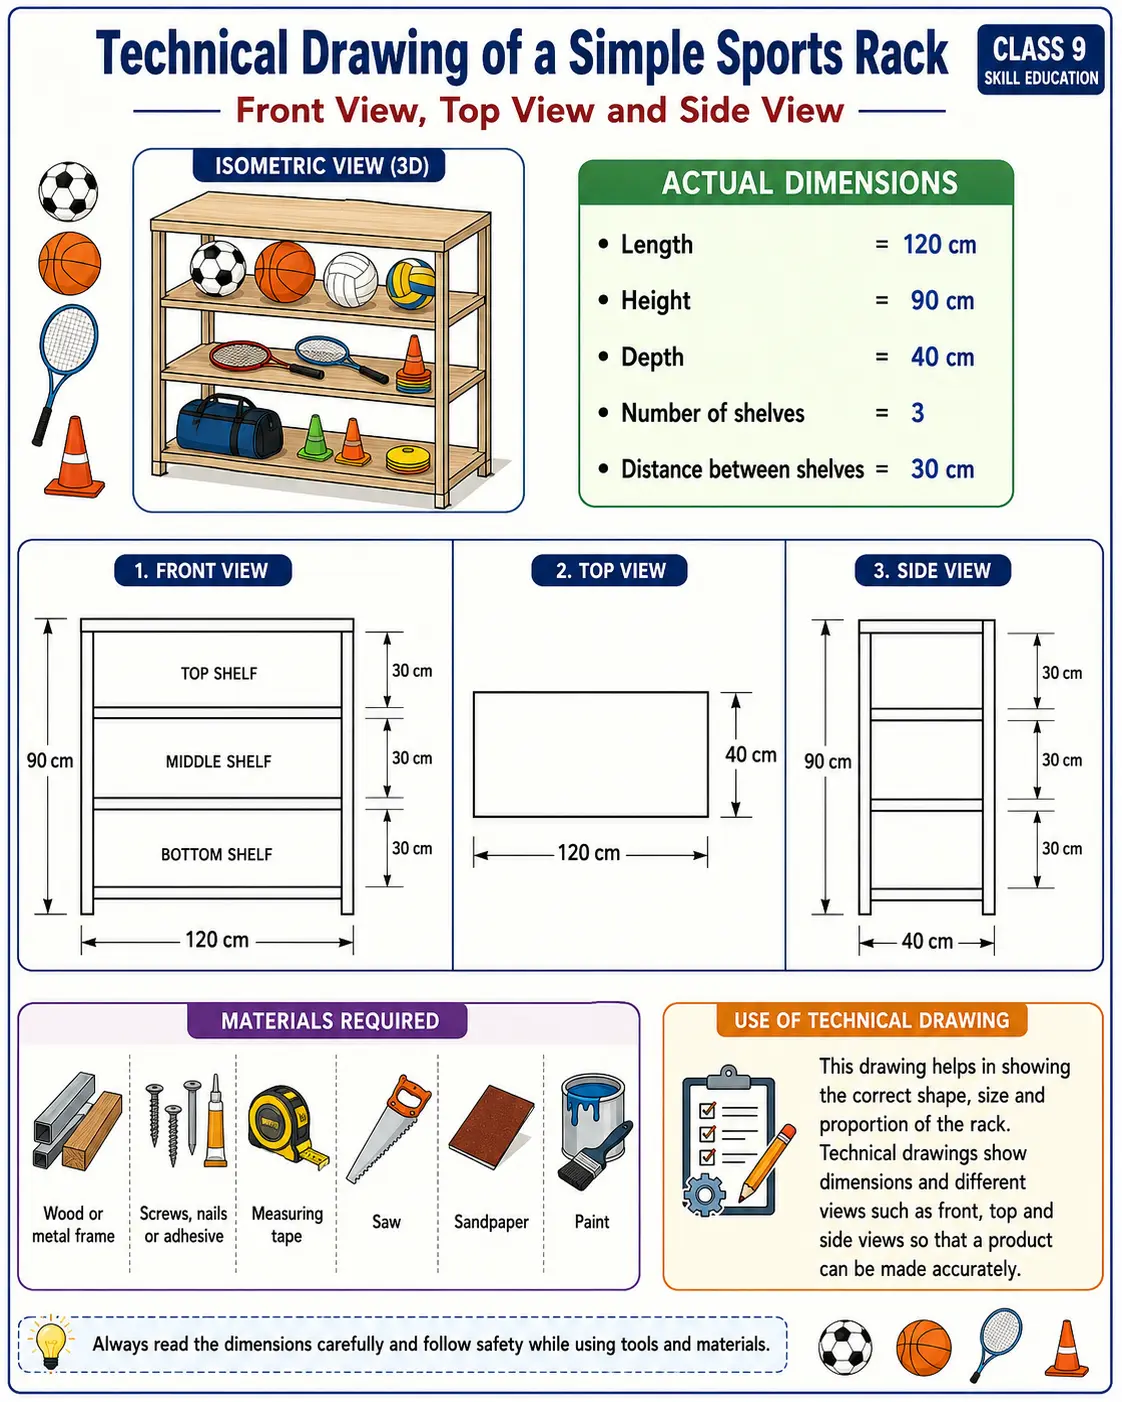
5Create a technical drawing (with front, top, and side views) of a simple rack for storing sports items.
A simple sports rack can be designed with three shelves. It may be used to store balls, rackets, cones and other sports items.
6Of the tasks that you did, which did you enjoy the most? Which did you enjoy the least? Give examples of what went well and what did not go well. What would you do differently next time?
I enjoyed making the technical drawing the most because it helped me understand how an object looks from the front, top and side. I also liked measuring and marking the dimensions because it made the work more accurate.
I enjoyed cutting and shaping the material the least because it required more care, patience and proper handling of tools. A small mistake in cutting can make the product uneven.
What went well
The design was prepared clearly. The measurements were written properly. The group worked together and divided the tasks among members.
What did not go well
Some markings were not very clear. A few parts were not cut exactly according to the measurement. Finishing took more time than expected.
What I would do differently next time
Next time, I would first prepare a clearer technical drawing, check all measurements twice, mark the material carefully and take help from the teacher before cutting. I would also keep the workplace clean and organised to avoid mistakes and accidents.
7Give examples of how you can apply your learnings in a real-life situation.
The learnings from this chapter can be applied in many real-life situations.
- Selecting the right material — I can choose suitable materials for different purposes, such as using steel or aluminium for kitchen utensils and not plastic because plastic melts on heating.
- Measuring accurately — I can use a metre tape to measure cloth, a scale for small objects and a distance metre or measuring tape for room length.
- Making simple products — I can make useful items such as a pen stand, small rack, tray, bird feeder or storage box by following proper steps.
- Reading technical drawings — I can understand simple drawings of furniture, rooms, shelves or plumbing layouts.
- Maintaining safety — I can follow safety rules while using tools, avoid touching hot surfaces, wear protective gear and keep the work area clean.
- Reducing wastage — Accurate measurement and proper planning help reduce wastage of wood, cloth, metal or other materials.
- Repair and household work — I can help in simple household tasks like measuring a space for a shelf, checking pipe size, marking cloth for cutting or identifying safety risks.
Thus, this chapter teaches practical skills that are useful in school projects, workshops, home repairs and future vocational work.
Open the separate notes / explanation page for this same chapter.
Open Notes / ExplanationReturn to the complete Kaushal Vikas chapter list.
View all chapters